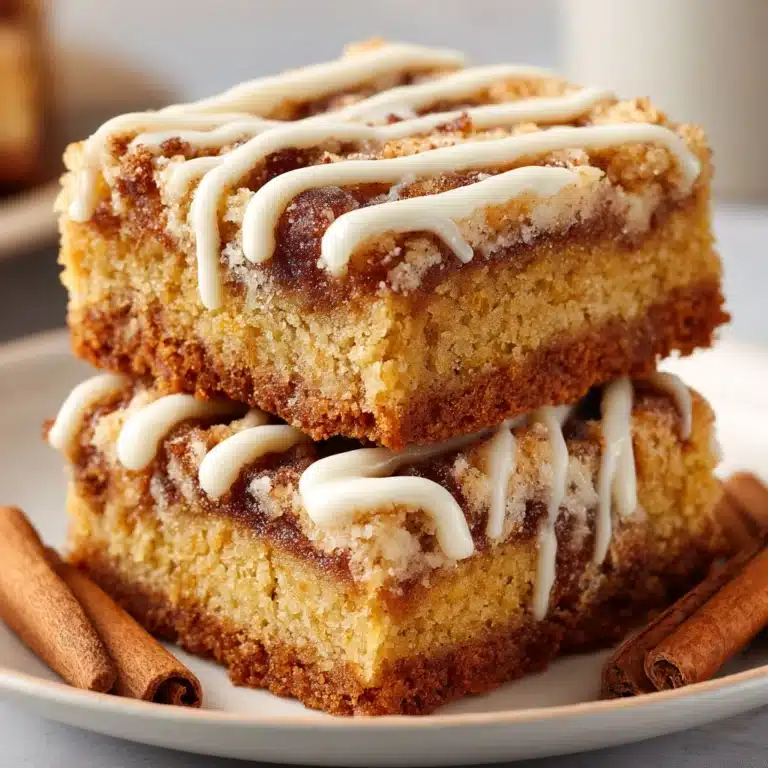
If you are searching for a dessert that combines the rich, velvety texture of red velvet cake with the delightful crispness of cookies, you must try this Red Velvet Cookie Cups with Cream Cheese Frosting Recipe. These charming little treats bring the best of both worlds together in a fun, bite-sized form that is perfect for sharing, gifting, or simply indulging at home. The vivid red color, subtle hint of cocoa, and that irresistibly creamy frosting on top make every bite a celebration of flavor and texture. Whether you’re making them for a festive occasion or a cozy weekend treat, these cookie cups never fail to impress.

Ingredients You’ll Need
Simple, straightforward ingredients come together in this recipe to create a truly spectacular dessert. Each ingredient plays an essential role in achieving the perfect balance of taste, texture, and that iconic red velvet hue.
- 1 1/2 cups all-purpose flour: The foundation that gives structure to your cookie cups, ensuring they hold their shape perfectly.
- 1 tbsp cocoa powder: Adds a subtle chocolate undertone essential for classic red velvet flavor.
- 1/2 tsp baking soda: Helps your cookie cups rise just right, creating a tender crumb.
- 1/4 tsp salt: Balances the sweetness and enhances every other flavor.
- 1/2 cup unsalted butter, softened: Adds richness and moisture for a soft, chewy texture.
- 1 cup granulated sugar: Sweetens the dough, providing that perfect cookie sweetness.
- 1 large egg: Binds the ingredients together and adds to the overall tenderness.
- 1 tsp vanilla extract: Elevates the flavors with a warm, aromatic hint.
- 2 tbsp buttermilk: Adds moisture and a subtle tang that’s signature in red velvet.
- 2 tbsp red food coloring: Gives the cookie cups that unmistakable, vibrant red color everyone loves.
- 1/2 tsp white vinegar: Works with the baking soda to enhance rise and flavor depth.
- 8 oz cream cheese, softened: The star of the frosting – creamy, tangy, and simply dreamy.
- 1/4 cup unsalted butter, softened: Adds smoothness and body to the frosting.
- 2 cups powdered sugar: Sweetens and thickens the frosting to just the right consistency.
- 1 tsp vanilla extract: Adds warmth and depth to the frosting’s flavor.
- Pinch of salt: Balances the sweetness and enhances the overall taste.
How to Make Red Velvet Cookie Cups with Cream Cheese Frosting Recipe
Step 1: Preheat the Oven
Start by setting your oven to 350°F (175°C). This ensures it reaches the perfect baking temperature by the time your dough is ready. Grease a mini muffin tin or line it with cupcake liners to prevent sticking and help your cookie cups keep their shape as they bake.
Step 2: Make the Cookie Dough
In a medium bowl, whisk the flour, cocoa powder, baking soda, and salt together. This mixture will provide structure and that classic red velvet hint of cocoa. In a separate large bowl, cream together the softened butter and sugar until the texture is light and fluffy — this usually takes about 2 to 3 minutes. Then add the egg, vanilla extract, and red food coloring, mixing well. Next, mix in the buttermilk and white vinegar before gradually adding your dry ingredients, folding them in until just combined. Avoid overmixing to keep your cookie cups tender.
Step 3: Shape the Cookie Cups
Using a tablespoon or small cookie scoop, portion the dough into each muffin cup. Press the dough gently to ensure it covers the base evenly but avoid compacting it too tightly. This helps create a perfect little cup for the frosting. Bake for about 8 to 10 minutes or until a toothpick inserted comes out clean. Let the cookie cups cool in the pan for 5 minutes before transferring them to a wire rack to cool completely. Cooling is key to avoid melting the frosting later on.
Step 4: Make the Cream Cheese Frosting
While your cookie cups cool, whip up the luscious cream cheese frosting. Beat the softened cream cheese and butter together until smooth and creamy. Gradually add the powdered sugar, vanilla, and a pinch of salt, mixing until the frosting is fluffy and spreadable. This frosting is what transforms these cookie cups from delicious to downright irresistible.
Step 5: Assemble the Cookie Cups
Once your cookie cups are fully cooled, use a piping bag fitted with your favorite tip or a simple spoon to add a generous swirl of cream cheese frosting on top of each cup. For an extra touch of charm, sprinkle some red velvet crumbs or colorful sprinkles. This final step not only adds flavor but also a beautiful presentation that will make these treats the star of any gathering.
How to Serve Red Velvet Cookie Cups with Cream Cheese Frosting Recipe

Garnishes
Adding garnishes can elevate your Red Velvet Cookie Cups with Cream Cheese Frosting Recipe to the next level. Consider decorating with finely chopped nuts, chocolate shavings, or fresh berries to complement the creaminess of the frosting. A light dusting of cocoa powder or a tiny drizzle of white chocolate can also add a delicate flair without overpowering the classic flavors.
Side Dishes
These cookie cups are incredibly versatile and pair beautifully with a variety of side treats. Serve them alongside a steaming cup of coffee, rich hot chocolate, or a creamy chai latte to create a cozy dessert experience. Fresh fruits like strawberries or raspberries also make a refreshing accompaniment that balances the richness of the frosting.
Creative Ways to Present
Presentation can be so much fun with this recipe! Try arranging the cookie cups on a tiered dessert stand for a party or drizzle a little chocolate or caramel sauce artistically over the tray. You could even serve them in mini cupcake liners topped with edible flowers or themed sprinkles for holidays. These ideas make your Red Velvet Cookie Cups with Cream Cheese Frosting Recipe not only delicious but visually stunning.
Make Ahead and Storage
Storing Leftovers
If you have any leftovers, store the cookie cups in an airtight container in the refrigerator. They will stay fresh for up to 3 days, maintaining both the texture of the cookie and the creaminess of the frosting without getting soggy.
Freezing
You can freeze these cookie cups for longer storage. Place them in a single layer on a baking sheet to freeze until solid, then transfer to a freezer-safe container or bag. Frozen cookie cups keep well for up to 2 months. When ready to enjoy, thaw them in the refrigerator overnight to preserve the cream cheese frosting’s texture.
Reheating
To gently warm the cookie cups without melting the frosting, let them come to room temperature or heat for a few seconds in the microwave on low power. Avoid high heat, which can cause the frosting to separate. This way, you get that fresh-baked taste even when reheating.
FAQs
Can I use regular milk instead of buttermilk?
Yes, you can substitute regular milk with a tablespoon of vinegar or lemon juice added to it and let it sit for 5 minutes, creating a buttermilk substitute that works well in this recipe.
What can I do if I don’t have red food coloring?
Natural alternatives like beet juice powder can give a red hue, but the vibrant color may be less intense. Using gel food coloring is another great option for more vivid results.
Can I make the frosting ahead of time?
Absolutely! Cream cheese frosting can be made up to 2 days in advance and stored in an airtight container in the refrigerator. Just whisk it again before use to restore its creamy texture.
Are these cookie cups gluten-free friendly?
This recipe calls for all-purpose flour, which contains gluten, but you can experiment replacing it with gluten-free flour blends suited for baking, keeping in mind the texture might vary slightly.
How long do the cookie cups last at room temperature?
Because of the cream cheese frosting, it’s best to keep these cookie cups refrigerated, as they can spoil quickly at room temperature, especially in warm environments.
Final Thoughts
I hope you give this Red Velvet Cookie Cups with Cream Cheese Frosting Recipe a try soon because it strikes the perfect balance between rich flavor and fun presentation. It’s a recipe that brings people together effortlessly, whether for a special occasion or a simple treat. Once you taste that soft, cocoa-tinged cookie base topped with silky cream cheese frosting, you’ll probably find yourself craving these delightful little cups again and again!
Print
Red Velvet Cookie Cups with Cream Cheese Frosting Recipe
- Total Time: 25 minutes
- Yield: 12 servings 1x
Description
Delight in these scrumptious Red Velvet Cookie Cups with Cream Cheese Frosting, a perfect bite-sized treat combining classic red velvet flavors and rich, creamy frosting. Ideal for parties or everyday indulgence, these cookie cups are easy to make and irresistibly delicious.
Ingredients
Dry Ingredients
- 1 1/2 cups all-purpose flour
- 1 tbsp cocoa powder
- 1/2 tsp baking soda
- 1/4 tsp salt
Wet Ingredients and Dough
- 1/2 cup unsalted butter, softened
- 1 cup granulated sugar
- 1 large egg
- 1 tsp vanilla extract
- 2 tbsp buttermilk
- 2 tbsp red food coloring
- 1/2 tsp white vinegar
Cream Cheese Frosting
- 8 oz cream cheese, softened
- 1/4 cup unsalted butter, softened
- 2 cups powdered sugar
- 1 tsp vanilla extract
- Pinch of salt
Instructions
- Preheat the Oven: Preheat your oven to 350°F (175°C). Grease a mini muffin tin or line it with cupcake liners to prepare for baking.
- Make the Cookie Dough: In a medium bowl, whisk together the flour, cocoa powder, baking soda, and salt. In a separate large mixing bowl, beat the softened butter and granulated sugar until light and fluffy, about 2-3 minutes. Add the egg, vanilla extract, and red food coloring; mix until fully combined. Then, stir in the buttermilk and vinegar. Gradually incorporate the dry ingredients, mixing until just combined to avoid overmixing.
- Shape the Cookie Cups: Scoop about 1 tablespoon of cookie dough into each muffin cup, pressing the dough gently to form small cups. Bake in the preheated oven for 8-10 minutes, or until a toothpick inserted in the center comes out clean. Let the cookie cups cool in the pan for 5 minutes before transferring them to a wire rack to cool completely.
- Make the Cream Cheese Frosting: In a large bowl, beat the softened cream cheese and butter together until smooth and creamy. Add the powdered sugar, vanilla extract, and a pinch of salt, then continue beating for 3-4 minutes until the frosting is fluffy and well combined.
- Assemble the Cookie Cups: Once the cookie cups have fully cooled, pipe or spread the cream cheese frosting onto each cup using a piping bag or spoon. Optionally, decorate with sprinkles or red velvet crumbs for an added festive touch.
- Serve and Enjoy: Serve immediately for best taste, or store the cookie cups in an airtight container in the refrigerator for up to 3 days to maintain freshness.
Notes
- Ensure the butter and cream cheese are softened to room temperature for smooth mixing.
- Do not overmix the batter to keep the cookie cups tender and soft.
- You can substitute buttermilk with regular milk mixed with a teaspoon of vinegar as a homemade alternative.
- Store leftover cookie cups refrigerated and allow them to come to room temperature before serving for optimal texture.
- Use mini muffin tins for perfect bite-sized cups; standard muffin tins will result in larger cookie cups requiring adjustments to baking time.
- Prep Time: 10 minutes
- Cook Time: 10 minutes
- Category: Dessert
- Method: Baking
- Cuisine: American


