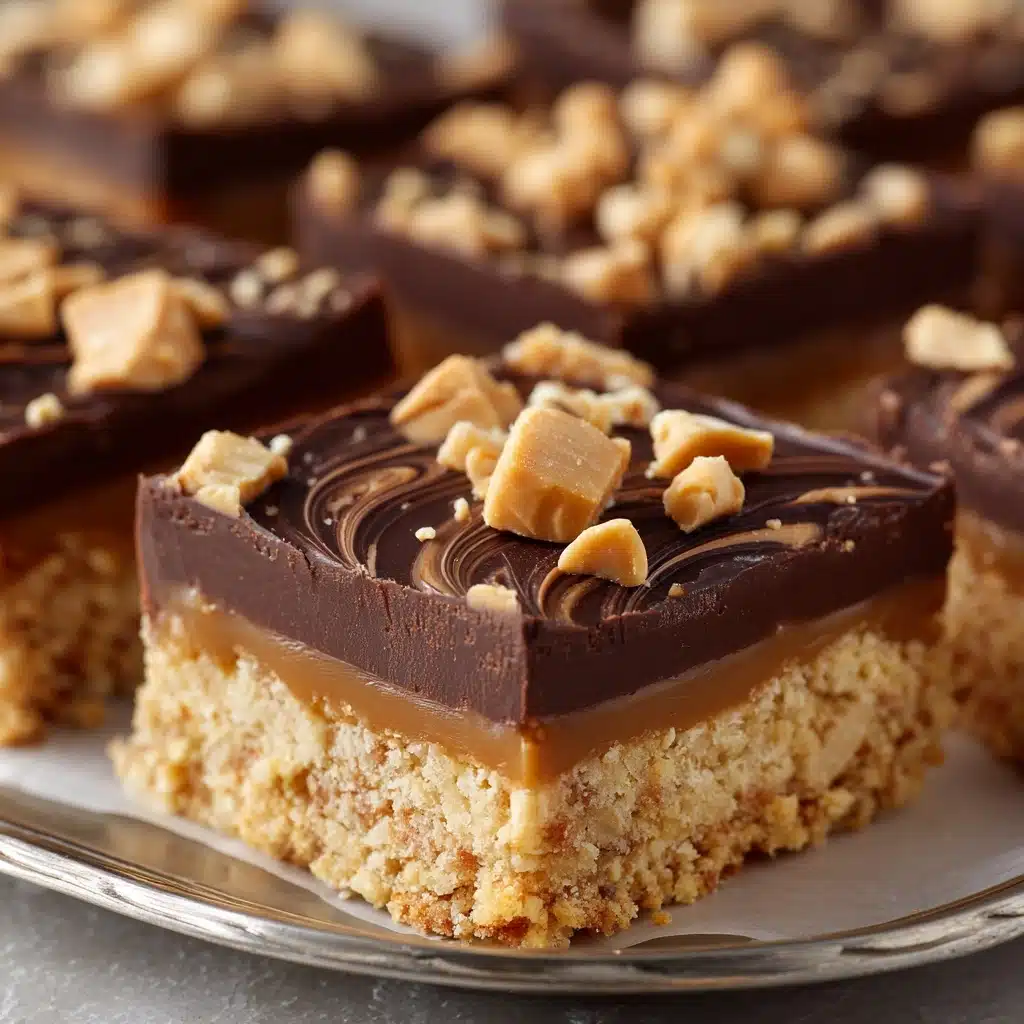
If you’re searching for the ultimate treat that’s equal parts nostalgic and irresistible, look no further than these No-Bake Peanut Butter Bars. With a crave-worthy combination of creamy peanut butter and rich chocolate layered over a buttery, slightly crunchy base, this recipe is a slam dunk for dessert lovers of all ages. Best of all, the bars are a cinch to whip up, require zero oven time, and taste just like your favorite peanut butter cup—only better and homemade! You’ll find yourself reaching for these crowd-pleasers to brighten up any occasion, from lunchbox surprises to special gatherings.
Ingredients You’ll Need
The beauty of No-Bake Peanut Butter Bars lies in their simplicity—each ingredient is carefully chosen to deliver the classic flavor, delightful texture, and gorgeous layers that make this recipe so memorable. Here’s how every component brings something special to the table:
- Unsalted butter (1 cup, melted): The buttery foundation gives the bars their rich flavor and helps hold everything together.
- Graham cracker crumbs (2 cups): These add a subtle crunch and a hint of honeyed sweetness to the base.
- Powdered sugar (2 cups): For sweetness and a melt-in-your-mouth texture that ties the base together.
- Creamy peanut butter (1 cup for base, 4 tablespoons for topping): The star of the show! Peanut butter brings creaminess and depth, and a little extra in the topping ensures a soft chocolate layer that cuts beautifully.
- Semisweet chocolate chips (1 1/2 cups): The perfect pairing for peanut butter, providing a smooth, decadent chocolate top.
How to Make No-Bake Peanut Butter Bars
Step 1: Prepare the Peanut Butter Base
In a large mixing bowl, combine the melted unsalted butter, graham cracker crumbs, powdered sugar, and 1 cup of creamy peanut butter. Stir everything together until the mixture looks uniform and smooth—don’t worry if it seems a bit thick; that’s what you want! The texture should be soft but hold its shape when pressed. This is the layer that gives your No-Bake Peanut Butter Bars their signature chew and satisfying bite.
Step 2: Press the Base into the Pan
Lightly grease or line a 9×13-inch pan with parchment paper for easy removal. Scoop your peanut butter mixture into the pan and use a spatula or your clean hands to press it down evenly. Make sure to get into the corners and aim for a flat, compact layer—this ensures every bite has the perfect ratio of base to topping. Take your time here; a smooth base sets the stage for those beautiful chocolate layers later.
Step 3: Make the Chocolate-Peanut Butter Topping
In a microwave-safe bowl, combine the semisweet chocolate chips and the remaining 4 tablespoons of creamy peanut butter. Microwave in 30-second intervals, stirring well between each burst, until the chocolate is completely melted and the mixture is glossy and smooth. The extra peanut butter not only gives the topping a silkier texture but also makes it easier to cut once chilled.
Step 4: Layer and Chill
Pour the warm chocolate-peanut butter topping over the pressed base. Use an offset spatula or the back of a spoon to spread it all the way to the edges, creating a thick, even layer. Now, the hardest part: patience! Refrigerate the pan for at least 2 hours, or until the bars are firm to the touch. This chilling time is non-negotiable—it helps the layers set and makes slicing neat, irresistible squares a breeze.
Step 5: Slice and Enjoy
Once fully chilled, lift the slab out of the pan using the parchment paper, if you used it. Use a sharp knife to cut the bars into squares or rectangles, wiping the blade between cuts for tidy edges. Now you’re ready to share (or not!) your perfect homemade No-Bake Peanut Butter Bars.
How to Serve No-Bake Peanut Butter Bars

Garnishes
Dress up your No-Bake Peanut Butter Bars with a sprinkle of flaky sea salt for a grown-up twist, or a handful of chopped roasted peanuts for crunch. You can also add a drizzle of extra melted chocolate or a dusting of powdered sugar if you’re feeling fancy—these little touches add visual appeal and flavor dimension.
Side Dishes
These bars are rich and satisfying, so they pair delightfully with lighter sides. Try serving them alongside fresh berries, a cold glass of milk, or even a scoop of vanilla ice cream. For a dessert platter, include some crisp apple slices or a fruit salad to balance the sweetness.
Creative Ways to Present
For parties, you can cut the bars into bite-sized squares and arrange them on a tiered dessert tray. If you’re giving them as gifts, wrap each piece in parchment and tie with twine for a homemade touch. For a fun twist, use cookie cutters to create festive shapes—your No-Bake Peanut Butter Bars will be the star of any cookie exchange or potluck.
Make Ahead and Storage
Storing Leftovers
Keep any leftover No-Bake Peanut Butter Bars in an airtight container in the refrigerator. They’ll stay fresh and delicious for up to one week, making them a fantastic option for grab-and-go snacks or make-ahead treats for busy days.
Freezing
Want to save some for later? These bars freeze beautifully! Layer them between sheets of parchment paper in a freezer-safe container. They’ll keep for up to three months—just thaw in the fridge before serving for the best texture and flavor.
Reheating
No reheating needed for these chilled treats. If you prefer a softer texture, simply let the bars sit at room temperature for 5 to 10 minutes before enjoying, but their fudgy bite is especially satisfying straight from the fridge.
FAQs
Can I use crunchy peanut butter instead of creamy?
Absolutely! Using crunchy peanut butter will add a bit of extra texture to the base, which many people love. Just be aware that the bars may not be quite as smooth, but they’ll still be delicious.
What can I substitute for graham cracker crumbs?
If you can’t find graham cracker crumbs, try using crushed digestive biscuits, vanilla wafers, or even pretzels for a salty twist. Just make sure the substitute is finely crushed for the best results.
Do No-Bake Peanut Butter Bars need to stay refrigerated?
Yes, it’s best to keep these bars chilled. The butter and chocolate layers will soften at room temperature, so refrigeration helps maintain their shape and makes slicing easier.
Can I make these bars gluten-free?
Definitely! Simply use gluten-free graham crackers or a similar gluten-free cookie in place of the regular graham cracker crumbs. All other ingredients are naturally gluten-free, but double-check your labels to be sure.
How do I prevent the chocolate layer from cracking when slicing?
Let the bars sit at room temperature for a few minutes before cutting, and use a sharp knife warmed under hot water (and wiped dry) for smooth, clean slices. This little trick makes those perfect squares so much easier!
Final Thoughts
If you’re looking for a sweet treat that’s as easy as it is impressive, these No-Bake Peanut Butter Bars have you covered. With their rich, decadent flavor and blissfully simple prep, they’re bound to become a go-to favorite in your kitchen. Don’t wait—give them a try and share the joy with friends and family!
Print
No-Bake Peanut Butter Bars Recipe
- Total Time: 2 hours 15 minutes (including chilling)
- Yield: 24 bars 1x
- Diet: Non-Vegetarian
Description
These No-Bake Peanut Butter Bars are a deliciously easy dessert combining a buttery, sweet peanut butter base with a rich chocolate topping. Perfectly smooth and indulgent, they require no baking and come together quickly, making them an ideal treat for any occasion.
Ingredients
Peanut Butter Base
- 1 cup unsalted butter, melted
- 2 cups graham cracker crumbs
- 2 cups powdered sugar
- 1 cup creamy peanut butter
Chocolate Topping
- 1 1/2 cups semisweet chocolate chips
- 4 tablespoons creamy peanut butter
Instructions
- Prepare the Peanut Butter Base: In a large bowl, combine the melted unsalted butter, graham cracker crumbs, powdered sugar, and 1 cup creamy peanut butter. Mix thoroughly until the mixture is smooth and fully combined.
- Press Base into Pan: Evenly press the peanut butter mixture into the bottom of a greased or parchment-lined 9×13-inch pan, ensuring the layer is uniform and compact.
- Melt Chocolate Topping: In a microwave-safe bowl, heat the semisweet chocolate chips and 4 tablespoons creamy peanut butter in 30-second intervals, stirring after each, until the mixture is completely melted and smooth.
- Spread Chocolate over Base: Pour the melted chocolate and peanut butter mixture over the prepared base, spreading it evenly to cover the entire surface.
- Chill and Set: Refrigerate the pan for at least 2 hours, or until the bars are firm and the chocolate topping has set.
- Serve: Once set, cut into 24 squares and serve chilled for the best texture and flavor.
Notes
- For added texture, fold in chopped peanuts or Rice Krispies into the peanut butter base before pressing it into the pan.
- Store leftover bars in the refrigerator for up to 1 week to maintain freshness.
- These bars can be frozen for longer storage; thaw them in the refrigerator before serving.
- Prep Time: 15 minutes
- Cook Time: 0 minutes
- Category: Dessert
- Method: No-Bake
- Cuisine: American
Nutrition
- Serving Size: 1 bar
- Calories: 280
- Sugar: 21 g
- Sodium: 150 mg
- Fat: 18 g
- Saturated Fat: 8 g
- Unsaturated Fat: 9 g
- Trans Fat: 0 g
- Carbohydrates: 27 g
- Fiber: 2 g
- Protein: 5 g
- Cholesterol: 15 mg


