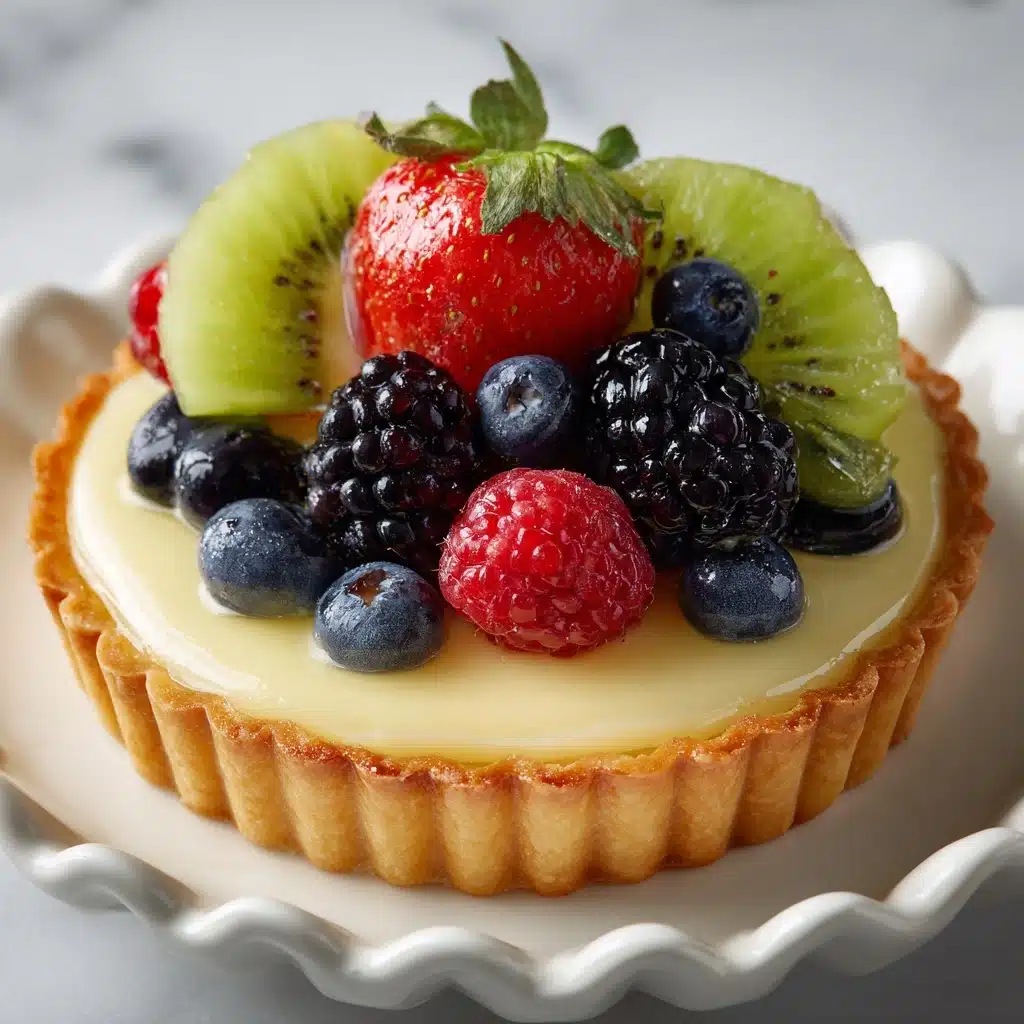
Bursting with vibrant colors and luxuriously creamy filling, Mini Fruit Tarts are truly the stars of any dessert table. These bite-sized delights are a fabulous blend of crisp golden crusts, velvety cream cheese filling, and an elegant arrangement of the juiciest fresh fruit—all finished with a glossy apricot glaze. Whether you’re whipping them up for a special celebration or treating yourself to a touch of everyday fanciness, these tarts promise a show-stopping finish and flavors that will have everyone coming back for seconds.
Ingredients You’ll Need
The magic of these Mini Fruit Tarts lies in their beautiful simplicity: every carefully chosen ingredient plays a role in building irresistible flavors, textures, and eye-catching appeal. Here’s what you’ll need and why it matters in this recipe.
- Refrigerated pie crusts: The fastest way to get that flaky, golden base without making dough from scratch—just roll, cut, and bake!
- Cream cheese: Once softened, it whips up delightfully smooth and provides the creamy foundation for our filling.
- Granulated sugar: Just the right touch of sweetness to balance the tangy cream cheese and fresh fruit.
- Vanilla extract: This tiny splash adds luscious warmth and aroma throughout the filling.
- Heavy cream, whipped: Folding in whipped cream makes the filling airy, light, and almost cloud-like.
- Assorted fresh fruit (berries, kiwi, mandarin oranges): Pick what’s colorful, ripe, and seasonal to decorate and flavor your tarts.
- Apricot jam: When heated and brushed on top, this jam creates a shiny, professional-looking glaze and keeps the fruit fresh.
- Water: Just a splash helps melt the jam into a perfect, brushable consistency for glazing.
How to Make Mini Fruit Tarts
Step 1: Prepare the Crusts
Preheat your oven to 375°F (190°C) and lightly grease a 24-cup mini muffin tin. Unroll your refrigerated pie crusts onto a floured counter and use a 3-inch biscuit cutter or glass to stamp out circles. These will become the cozy shells for your tarts. Press each circle gently into the mini muffin cups, nudging them into shape so they hug the sides, then prick the bottom with a fork to prevent any puffing while they bake.
Step 2: Bake and Cool the Tart Shells
Slide the muffin tin into your preheated oven and bake the shells for about 10 to 12 minutes, or until they turn lightly golden and crisp around the edges. Once they’re done, remove them from the oven and allow the tart shells to cool completely in the pan before handling. This helps them stay sturdy and ready to hold that luscious filling.
Step 3: Make the Creamy Filling
While the tart shells are cooling, grab a mixing bowl and beat together the softened cream cheese, sugar, and vanilla extract until the mixture is perfectly smooth and creamy. In a separate bowl, whip the heavy cream until stiff peaks form. Gently fold the whipped cream into the cream cheese mixture to create a light, billowy filling that’s hard to resist.
Step 4: Fill the Tart Shells
Once the shells are cool, it’s time to fill them with that dreamy cream cheese blend. You can spoon the filling in or, for a little extra flair, pipe it for a swirled look. Fill each tart shell nearly to the top, leaving just enough space for the fruit.
Step 5: Decorate With Fresh Fruit
Arrange colorful slices of fresh fruit on top of the cream filling—think kiwi wedges, berry halves, mandarin segments, or your own creative combinations. Have fun with the colors and shapes for maximum wow-factor; there’s no wrong way to top a mini fruit tart!
Step 6: Glaze for Shine and Freshness
In a small saucepan, heat together the apricot jam and water over low heat until smooth and liquefied. Using a pastry brush, lightly dab the warm glaze over the fruit on each tart. This not only gives your Mini Fruit Tarts a professional, glossy finish but also helps keep the fruit fresh.
Step 7: Chill Before Serving
Place the assembled tarts in the refrigerator and chill them for at least 30 minutes. This step lets the filling set and the flavors meld, ensuring each bite is perfectly refreshing and satisfying when you serve.
How to Serve Mini Fruit Tarts

Garnishes
While these Mini Fruit Tarts are already beautiful, adding a sprinkle of powdered sugar, a mint leaf, or a tiny flourish of lemon zest can take them to the next level. Not only do these touches add visual appeal, but they can also lend a subtle pop of flavor that surprises and delights your guests.
Side Dishes
Pair your mini tarts with a scoop of lemon or raspberry sorbet for extra brightness, a platter of crisp butter cookies, or even some chocolate-dipped strawberries for a truly celebratory spread. These accompaniments bring out the best in the tarts without overwhelming their delicate flavor.
Creative Ways to Present
Arrange your Mini Fruit Tarts on a tiered cake stand for high tea, tuck each into colorful mini cupcake liners, or line them up on a simple white platter to let their vibrant fruit shine. They also look adorable nestled in a box as a homemade gift for friends and family!
Make Ahead and Storage
Storing Leftovers
Leftover Mini Fruit Tarts should be stored in an airtight container in the refrigerator. They’ll stay fresh and lovely for about one to two days—the crust may soften a little, but the flavors remain divine.
Freezing
If you want to get ahead on prep, freeze the unfilled baked tart shells for up to a month; just let them cool thoroughly first and place them in a single layer between sheets of parchment paper. It’s best not to freeze filled or decorated tarts, as the fresh fruit and cream cheese filling won’t hold up well after thawing.
Reheating
You don’t need to reheat Mini Fruit Tarts before serving—they’re meant to be enjoyed chilled. If you’ve frozen baked shells, let them come to room temperature before filling and serving for the best texture.
FAQs
Can I use a homemade pie crust instead of refrigerated?
Absolutely! If you have a go-to homemade pie crust recipe, feel free to use it for your Mini Fruit Tarts. Just keep the circles at about 3 inches and watch the baking time, as homemade crusts might brown a tad faster.
Which fruits work best for the topping?
Berries (blueberries, strawberries, raspberries), sliced kiwi, grapes, and mandarin oranges are all wonderful choices. If you like a tropical twist, try mango or pineapple—just be sure to cut everything small enough to fit on the mini tarts.
What if I don’t have mini muffin tins?
You can make slightly larger tartlets using a standard muffin tin; you’ll just need to cut your crust circles a little bigger and adjust the yield accordingly. Small tart pans also work beautifully if you have them on hand.
Can I make these Mini Fruit Tarts gluten-free?
Definitely! Simply substitute with a gluten-free pie crust, either homemade or store-bought. All other ingredients in this recipe are naturally gluten-free, making the swap super easy.
Is it necessary to glaze the fruit?
The apricot glaze is optional but highly recommended if you want your tarts to sparkle and the fruit to stay fresh and vibrant. If you plan to serve the tarts immediately, you can skip the glaze without worry.
Final Thoughts
Every time you serve Mini Fruit Tarts, you’ll see faces light up with joy—they’re truly a delight to make, eat, and share. Don’t hesitate to get creative with your fruit choices and garnishes. Give this recipe a try, and let these playful, colorful gems become a treasured favorite in your dessert rotation!
Print
Mini Fruit Tarts Recipe
- Total Time: 37 minutes
- Yield: 24 tarts 1x
- Diet: Vegetarian
Description
Delight in these beautiful Mini Fruit Tarts that are as delicious as they are adorable. A buttery pie crust filled with a creamy, sweetened cream cheese mixture, topped with a colorful array of fresh fruits and a shiny apricot glaze. Perfect for parties or a sweet treat any day.
Ingredients
Pie Crust:
- 1 package (14 oz) refrigerated pie crusts (2 crusts)
Cream Cheese Filling:
- 1 package (8 oz) cream cheese, softened
- 1/4 cup granulated sugar
- 1 teaspoon vanilla extract
- 1/2 cup heavy cream, whipped
Additional:
- Assorted fresh fruit such as berries, kiwi, or mandarin oranges
- 1/4 cup apricot jam
- 1 tablespoon water
Instructions
- Preheat Oven: Preheat oven to 375°F (190°C) and lightly grease a 24-cup mini muffin tin.
- Prepare Pie Crust: Roll out pie crusts and cut into circles. Press into muffin cups and bake until golden.
- Make Filling: Beat cream cheese, sugar, and vanilla until smooth. Fold in whipped cream.
- Fill Tart Shells: Spoon or pipe filling into cooled tart shells.
- Add Fruit: Arrange fresh fruit on top of the filling.
- Apply Glaze: Heat apricot jam and water, then brush over the fruit.
- Chill and Serve: Chill tarts for at least 30 minutes before serving.
Notes
- For a shortcut, use pre-made phyllo shells instead of pie crusts.
- The glaze helps keep the fruit fresh and shiny, but you can skip it if serving immediately.
- Best eaten the same day they are assembled.
- Prep Time: 25 minutes
- Cook Time: 12 minutes
- Category: Dessert
- Method: Baking
- Cuisine: American, French-inspired
Nutrition
- Serving Size: 1 tart
- Calories: 110
- Sugar: 6 g
- Sodium: 70 mg
- Fat: 7 g
- Saturated Fat: 4 g
- Unsaturated Fat: 2 g
- Trans Fat: 0 g
- Carbohydrates: 10 g
- Fiber: 1 g
- Protein: 1 g
- Cholesterol: 20 mg


