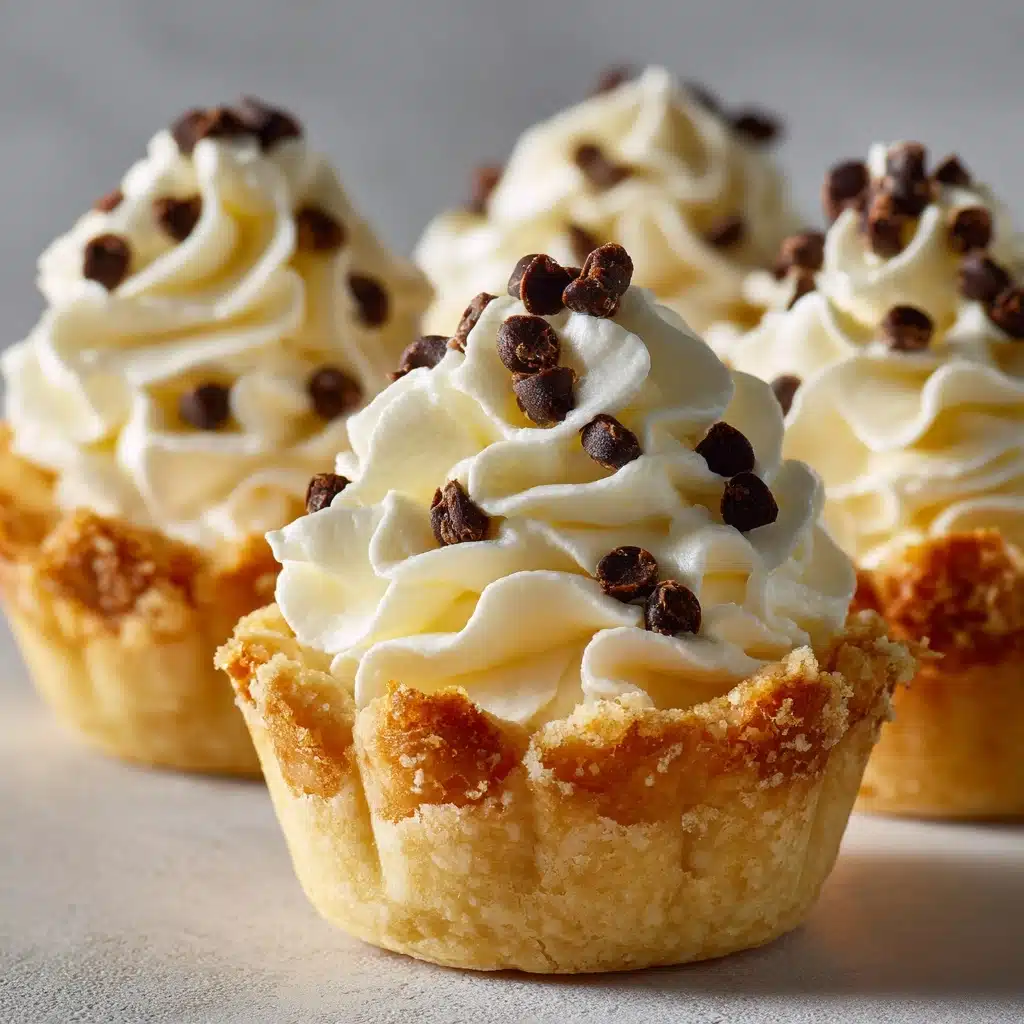
Mini Cannoli Cups are the ultimate bite-sized treat for anyone who adores the classic cannoli but craves something quicker, easier, and just a little bit whimsical. Imagine crisp, golden shells filled with a sweet, creamy ricotta and mascarpone mixture, dotted with chocolate chips and infused with a hint of orange zest—each one like a little taste of Italy in your hand. They’re perfect for parties, holiday platters, or anytime you want to impress without spending ages in the kitchen. If you love desserts that look fancy but are secretly simple, these Mini Cannoli Cups will become your new go-to!
Ingredients You’ll Need
You won’t believe how just a handful of easy-to-find ingredients can transform into bakery-worthy Mini Cannoli Cups. Each one plays a special role, from the perfectly crunchy base to the decadently smooth filling, right down to those bright and irresistible garnishes.
- Refrigerated pie crusts: An effortless hack that creates the perfect crisp shell, saving time without sacrificing flavor.
- Ricotta cheese (drained): The traditional heart of cannoli filling—drain it well for that classic creamy texture.
- Mascarpone cheese: Adds richness and a subtle tang, making the filling luxuriously smooth.
- Powdered sugar: Sweetens the filling to just the right level, melting seamlessly into the mixture.
- Vanilla extract: A splash of pure vanilla brings beautiful depth and warmth to every bite.
- Ground cinnamon: A pinch gives the filling that signature hint of spice.
- Mini chocolate chips: Little bursts of chocolate in every mouthful—don’t skip these!
- Orange zest (optional): For a bright, citrusy lift that really wakes up the flavors.
- Powdered sugar (for dusting): A pretty finishing touch that also gives a sweet bite as you pick up each cup.
- Mini chocolate chips or chopped pistachios (for garnish): Pick your favorite (or do both) for colorful contrast and crunch.
How to Make Mini Cannoli Cups
Step 1: Prep and Shape the Shells
Preheat your oven to 425°F. Unroll the refrigerated pie crusts onto a floured surface and use a 2½-inch round cookie cutter to punch out as many circles as possible. Gently press each circle into the wells of a mini muffin tin, forming little cups that will cradle the creamy filling later. Don’t forget to prick the bottoms with a fork—this avoids air bubbles and keeps your Mini Cannoli Cups looking perfect. Pop them into the oven and bake for 8 to 10 minutes, or until they’re just golden brown around the edges. Let them cool completely in the pan; you want them sturdy enough to hold that rich filling!
Step 2: Create the Cannoli Filling
While your shells are cooling, it’s time to whip up the decadent heart of these Mini Cannoli Cups. In a medium bowl, mix together the drained ricotta, mascarpone cheese, powdered sugar, vanilla extract, cinnamon, and orange zest if you’re using it. Stir until everything is smooth and dreamy. Then, gently fold in the mini chocolate chips so every bite is dotted with chocolate. For the best texture, pop the filling in the fridge for at least 30 minutes to firm up—this makes spooning and piping a breeze.
Step 3: Assemble and Garnish
Once the shells are cool and your filling is set, it’s time to bring everything together! You can either spoon or pipe the luscious filling into each cup—piping gives a super clean, bakery-style look, but a spoon works just as well if you’re going for that homemade charm. Don’t be shy with the garnishes: sprinkle a few more mini chocolate chips or chopped pistachios on each cup, and finish with a generous dusting of powdered sugar for that irresistible, just-like-the-bakery finish.
How to Serve Mini Cannoli Cups

Garnishes
The garnishes make these Mini Cannoli Cups truly eye-catching. I love to alternate between classic mini chocolate chips and vibrant chopped pistachios for a beautiful contrast in both color and crunch. If you’re feeling extra fancy, a little more orange zest or a small mint leaf on top adds a pop of color and freshness.
Side Dishes
If you’re serving these at a gathering, pair your Mini Cannoli Cups with fresh fruit platters or a scoop of vanilla gelato. For coffee lovers, a hot espresso or a creamy cappuccino on the side really turns dessert into an event. These little cups are so rich, you don’t need anything too heavy alongside.
Creative Ways to Present
Presentation can be as fun as the baking itself! Arrange your Mini Cannoli Cups on a vintage cake stand for a playful, elegant touch, or place each in a colorful paper liner for a party vibe. For special occasions, nestle them among edible flowers or scatter extra chocolate chips and nuts around the platter. They look gorgeous grouped by type—some with chocolate chips, some with pistachio, some with a sprinkle of zest!
Make Ahead and Storage
Storing Leftovers
If you have any Mini Cannoli Cups left (and honestly, that’s rare!), store them covered in the refrigerator. For the best texture, keep the shells and filling separate until just before serving; filled cups are best enjoyed within a day, as the shells can soften over time.
Freezing
You can freeze the unfilled shells in an airtight container for up to one month—just thaw at room temperature before using. While the mascarpone-ricotta filling is best fresh, you can make and freeze it separately in an airtight container for up to two weeks. Thaw in the fridge, give it a brisk stir, then fill as usual.
Reheating
For crispiness, you can re-crisp unfilled cups by warming them in a 300°F oven for a few minutes. Filled Mini Cannoli Cups are best served cold or at room temperature—no need to reheat! Just dust with a touch of fresh powdered sugar before serving if needed.
FAQs
Can I make Mini Cannoli Cups ahead of time?
Absolutely! Make the shells and filling separately up to a day in advance. Assemble them just before serving so the shells stay perfectly crisp and the filling is cool and creamy.
Why does the ricotta need to be drained?
Draining ricotta removes excess moisture, ensuring your filling is thick, rich, and never runny. Simply use a fine mesh sieve or cheesecloth, and let it rest in the fridge to drain before mixing.
Can I substitute the mascarpone cheese?
If mascarpone isn’t available, you can use full-fat cream cheese as a substitute. The flavor will be slightly tangier, but the filling will still be deliciously creamy and satisfying.
What if I don’t have a mini muffin pan?
If you don’t have a mini muffin tin, you can use regular muffin pans for larger cups—just increase the circle size and bake time slightly. Or, bake freestyle rounds on a sheet and shape them by hand while still warm.
Are Mini Cannoli Cups gluten-free?
Traditional pie crusts contain wheat, but you can easily use a gluten-free refrigerated pie dough to make these treats suitable for gluten-free friends and family.
Final Thoughts
Mini Cannoli Cups are one of those desserts that truly deliver big joy in small bites. Don’t be surprised if they vanish in moments—everyone loves them! I can’t wait for you to try these charming treats and make them part of your own special traditions.
Print
Mini Cannoli Cups Recipe
- Total Time: 30 minutes
- Yield: 24 mini cups 1x
- Diet: Vegetarian
Description
These Mini Cannoli Cups are a delightful twist on classic cannoli, featuring a crispy pie crust shell filled with a creamy blend of ricotta, mascarpone, and chocolate chips. Perfect for a sweet bite-sized treat!
Ingredients
Pie Crust Cups:
- 1 package (15 oz) refrigerated pie crusts (2 crusts)
Cannoli Filling:
- 1 cup ricotta cheese (drained)
- ½ cup mascarpone cheese
- ½ cup powdered sugar
- 1 teaspoon vanilla extract
- ¼ teaspoon ground cinnamon
- ¼ cup mini chocolate chips
- 1 tablespoon orange zest (optional)
Garnish:
- Powdered sugar (for dusting)
- Mini chocolate chips or chopped pistachios (for garnish)
Instructions
- Preheat oven: Preheat oven to 425°F.
- Prepare pie crust cups: Unroll pie crusts and cut out circles using a 2½-inch round cookie cutter. Gently press each circle into a mini muffin tin to form a cup. Prick the bottoms with a fork. Bake for 8–10 minutes, or until golden brown. Remove and let cool completely in the pan.
- Make the filling: In a medium bowl, mix ricotta, mascarpone, powdered sugar, vanilla, cinnamon, and orange zest until smooth. Fold in mini chocolate chips. Refrigerate for at least 30 minutes to firm up.
- Fill the cups: Once the cups are cool, spoon or pipe the filling into each shell. Garnish with extra mini chocolate chips or chopped pistachios, and dust with powdered sugar before serving.
Notes
- For best results, drain ricotta in a fine mesh strainer or cheesecloth for a few hours before using.
- The filling can be made a day ahead. Fill cups just before serving to keep the shells crisp.
- Prep Time: 20 minutes
- Cook Time: 10 minutes
- Category: Dessert
- Method: Baking
- Cuisine: Italian
Nutrition
- Serving Size: 1 mini cup
- Calories: 110
- Sugar: 6g
- Sodium: 65mg
- Fat: 7g
- Saturated Fat: 3.5g
- Unsaturated Fat: 3g
- Trans Fat: 0g
- Carbohydrates: 9g
- Fiber: 0g
- Protein: 2g
- Cholesterol: 10mg


