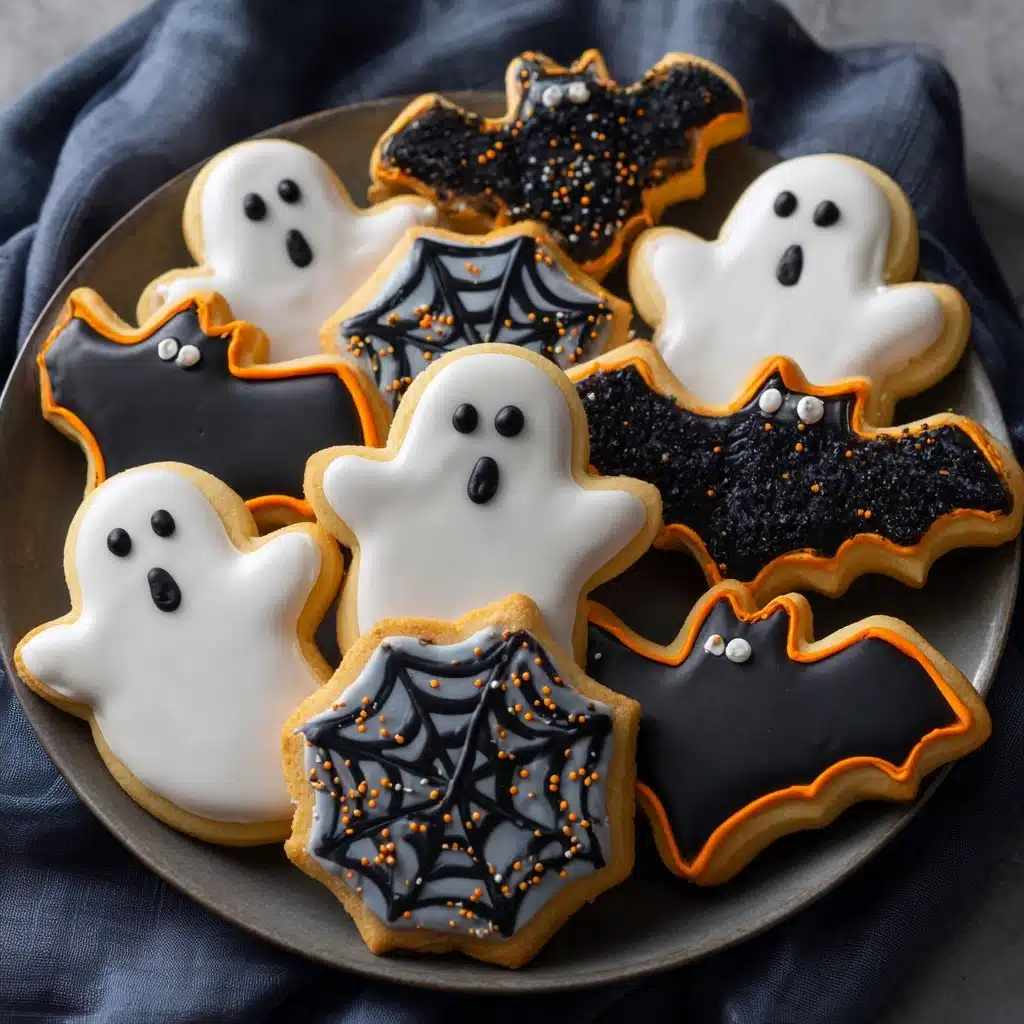
If you’re ready to take your Halloween festivities from fun to absolutely unforgettable, these Halloween Royal Icing Cookies are your secret weapon. They’re buttery, impossibly tender sugar cookies dressed up in vibrant, delightfully spooky designs thanks to smooth royal icing. Whether you’re making them as party centerpieces or sharing trays with friends, decorating these cookies is half the fun—and the flavors deliver that perfect blend of nostalgia and celebration. Believe me, nothing brings out the Halloween spirit quite like a plateful of home-baked, colorfully-creepy treats!

Ingredients You’ll Need
The magic of these cookies lies in their simplicity: each ingredient plays a starring role, from the vanilla-scented sugar cookie base to the glossy, easy-to-tint royal icing. Don’t worry, nothing here is overly fancy, but the results will taste and look straight out of a bakery window!
- All-purpose flour: The backbone of our cookies, giving them structure while keeping them tender enough for every bite to melt in your mouth.
- Baking powder: A tiny lift is all you need, making sure each cookie keeps its shape but never feels tough.
- Salt: Just enough to balance the sweetness and amplify all those lovely flavors.
- Unsalted butter (softened): Essential for that rich, creamy dough—let it come to room temperature for the best blending!
- Granulated sugar: Sweetness and just the right texture, adding crispness to the finished cookies.
- Large egg: Binds everything together for cookies that hold up to all your creative cut-outs.
- Vanilla extract: Brings a cozy, classic aroma and warmth to every bite.
- Almond extract (optional): For a subtle, nutty flavor that makes these cookies even more memorable—use it if you have it!
- Powdered sugar: The secret to silky-smooth royal icing that hardens perfectly for decorating.
- Meringue powder: Provides structure and sheen to the icing, making it stable and easy to work with.
- Water: Just enough to bring your royal icing to piping and flooding consistency—a little goes a long way.
- Food coloring (black, orange, purple, green): Transform plain white icing into a monster mash of festive hues.
- Sprinkles and candy eyes (optional): These fun add-ons let you personalize each cookie for the ultimate Halloween display.
How to Make Halloween Royal Icing Cookies
Step 1: Prepare the Cookie Dough
Start by whisking together your flour, baking powder, and salt in a bowl—this combo guarantees cookies that keep their shape but are still unbelievably soft. Meanwhile, cream the softened butter and sugar together until they’re light and fluffy, then add the egg and both extracts (if using). Gradually mix in the dry ingredients to create a dough that’s smooth but not sticky. Split the dough in two, shape each half into a disk, and chill them for at least 30 minutes. This helps the dough roll out perfectly and makes your cut-outs look extra sharp!
Step 2: Roll and Cut Your Shapes
Once chilled, roll the dough on a lightly floured surface to about 1/4-inch thickness. The real fun begins here—grab your favorite Halloween cookie cutters! Pumpkins, ghosts, bats, and cats are always a hit, but go wild with whatever shapes you love. Carefully transfer them to lined baking sheets, leaving a bit of room between each for even baking.
Step 3: Bake to Perfection
Bake your cut-out cookies at 350°F for 8 to 10 minutes, just until the edges show a hint of golden color. You want to pull them out before they brown—they’ll finish setting as they cool. Let them rest on the baking sheet for a couple of minutes before moving to a wire rack to cool completely. This is crucial: decorating on warm cookies leads to melty, runny icing, so patience is key!
Step 4: Make the Royal Icing
For that signature sleek finish, beat powdered sugar, meringue powder, and 6 tablespoons of water on low for a minute, then crank up to high for 4–5 minutes until stiff peaks form. Need thinner icing for flooding the centers? Add a teaspoon of water at a time until you reach the perfect consistency. Divide your icing and tint each batch with vibrant food coloring—you’ll create a Halloween palette worthy of any haunted mansion.
Step 5: Decorate Like a Pro
Spoon your icings into piping bags (or squeeze bottles for little hands), and outline your cooled cookies first. Let the borders set, then thin icing slightly for flooding the centers. Add sprinkles, candy eyes, and other decorative touches before the icing sets. Let your masterpieces dry for several hours or overnight: this gives you that glossy, bakery-perfect finish that makes Halloween Royal Icing Cookies stand out on any treat table.
How to Serve Halloween Royal Icing Cookies
Garnishes
Pile your finished cookies onto a platter and sprinkle with extra edible glitter, spooky-shaped sprinkles, or tuck in a few gummy worms for a playful—and slightly creepy—touch. For extra fun, stick on candy eyes or write spooky words with a contrasting icing color right before serving.
Side Dishes
Pair these Halloween Royal Icing Cookies with creamy hot chocolate, apple cider, or pumpkin-spiced milkshakes for a cozy treat spread. If you’re hosting a party, add bowls of popcorn or a fruit platter dotted with chocolate-covered strawberries made to look like little mummies or monsters.
Creative Ways to Present
For a real wow factor, stack your cookies in a haunted house-shaped box or arrange them around a cauldron centerpiece filled with dry ice for spooky fog effects. You can also wrap each cookie individually in clear cellophane bags with a festive ribbon—perfect for party favors or trick-or-treat handouts!
Make Ahead and Storage
Storing Leftovers
Once the icing is completely set, store your Halloween Royal Icing Cookies in an airtight container at room temperature. They’ll stay fresh and crisp for up to a week—just be sure to layer them with parchment so the decorations stay flawless.
Freezing
If you’re planning ahead, freeze the undecorated cookies in airtight bags for up to 2 months. Let them thaw at room temperature before decorating. While you can technically freeze already-decorated cookies, keep in mind that condensation during thawing can sometimes make the icing less pristine.
Reheating
No need to reheat—these cookies are best enjoyed at room temperature. If you want that fresh-baked warmth, pop the undecorated cookies in a 300°F oven for 2 to 3 minutes, but avoid reheating once they’ve been decorated to keep the royal icing looking sharp.
FAQs
Can I make the dough in advance?
Absolutely! Prepare your dough ahead of time and chill it in the fridge for up to 2 days, or freeze dough disks for up to 1 month. Just let it thaw and soften a bit at room temperature before rolling out.
How long does the royal icing take to dry?
The icing sets up in just a few hours for light handling, but for that crisp, stackable finish, it’s best to let the cookies dry overnight in a cool, dry place.
Can I use liquid egg whites instead of meringue powder?
You can! Substitute 3 tablespoons of pasteurized liquid egg whites for the meringue powder and water, but keep an eye on the final texture; the icing should form stiff peaks before thinning for flooding.
What if I don’t have Halloween cookie cutters?
No need to panic—simply use circles or other basic shapes, then decorate them with spooky faces, webs, or eye designs. The real magic is in the icing decor!
What’s the secret to cookies that keep their shape?
Chilling the dough and avoiding overmixing are your best bets for perfect cut-out shapes. Roll the dough evenly and refrigerate again briefly after cutting if it begins to soften too much.
Final Thoughts
These Halloween Royal Icing Cookies are my go-to for making spooky season extra special, and I can’t recommend them enough. Invite your family or friends to join in on decorating, and you’ll create amazing memories—and some incredibly tasty treats. Bring on the ghosts, pumpkins, and bats—let your creativity (and sweet tooth) run wild!
Print
Halloween Royal Icing Cookies Recipe
- Total Time: 55 minutes (plus drying time for icing)
- Yield: 24 cookies 1x
- Diet: Vegetarian
Description
Delight your Halloween party guests with these spooky and sweet Royal Icing Cookies. Perfect for both kids and adults, these festive treats are as fun to make as they are to eat!
Ingredients
For the cookies:
- 2 3/4 cups all-purpose flour
- 1/2 teaspoon baking powder
- 1/2 teaspoon salt
- 1 cup unsalted butter, softened
- 1 cup granulated sugar
- 1 large egg
- 1 1/2 teaspoons vanilla extract
- 1/2 teaspoon almond extract (optional)
For the royal icing:
- 4 cups powdered sugar
- 3 tablespoons meringue powder
- 6–8 tablespoons water
- Food coloring (black, orange, purple, green)
- Sprinkles and candy eyes for decorating (optional)
Instructions
- Preheat the oven: Preheat the oven to 350°F and line baking sheets with parchment paper.
- Prepare the dough: Whisk together the flour, baking powder, and salt. Beat butter and sugar until fluffy. Add egg, vanilla, and almond extract. Mix in dry ingredients to form dough. Chill for 30 minutes.
- Roll and cut: Roll out dough, cut shapes, and bake for 8–10 minutes until edges are golden. Cool completely.
- Make icing: Beat powdered sugar, meringue powder, and water until stiff peaks form. Color and decorate cookies using piping bags or squeeze bottles. Let dry.
Notes
- Make cookies ahead and freeze undecorated if needed.
- Icing dries best in a cool, dry place.
- Royal icing can be made up to 1 week in advance and stored in the fridge in an airtight container.
- Prep Time: 45 minutes (includes dough chilling)
- Cook Time: 10 minutes
- Category: Dessert
- Method: Baking
- Cuisine: American
Nutrition
- Serving Size: 1 cookie
- Calories: 170
- Sugar: 18 g
- Sodium: 70 mg
- Fat: 6 g
- Saturated Fat: 4 g
- Unsaturated Fat: 2 g
- Trans Fat: 0 g
- Carbohydrates: 28 g
- Fiber: 0 g
- Protein: 1 g
- Cholesterol: 20 mg


