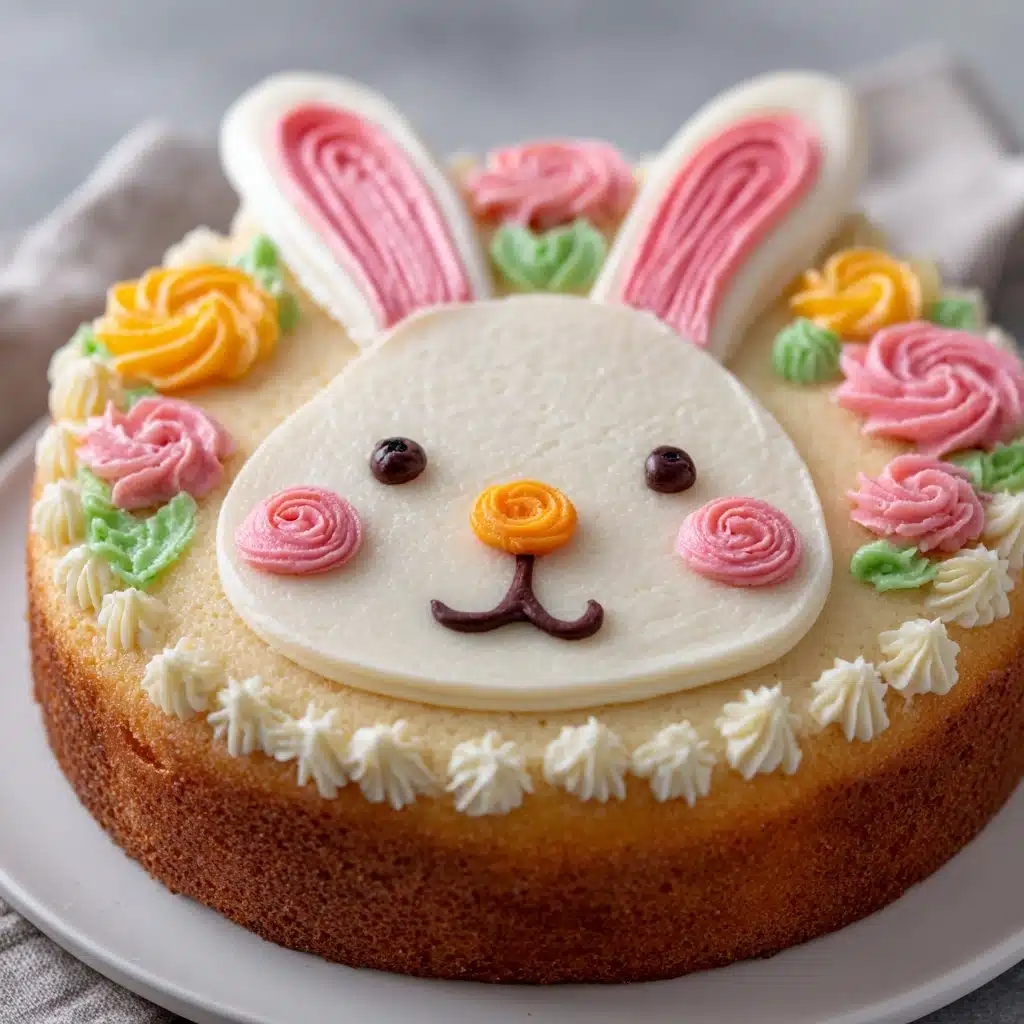
The Easter Bunny Cake is the ultimate showstopper for your springtime celebration, bringing together fluffy cake, sweet coconut, and whimsical decorations in one adorable package. This festive treat isn’t just eye-catching—it’s also surprisingly easy to make, so you can enjoy both the process and the praise! With its coconut “fur” and playful candy accents, the Easter Bunny Cake is sure to delight kids and adults alike, making it a beloved tradition you’ll want to return to year after year.
Ingredients You’ll Need
This recipe proves that you don’t need fancy ingredients to create something magical! Every item on this list plays a key role in the Easter Bunny Cake’s irresistible flavor, irresistible texture, and charming look.
- White cake mix: The perfect blank canvas for decorating, and makes for a soft, tender crumb every time.
- Eggs, oil, and water: These bring the boxed mix to life—follow the box instructions for the right amounts!
- Sweetened shredded coconut: Gives the cake its signature “bunny fur” and a delightful chewiness.
- Vanilla frosting: Acts as the glue for the coconut and decorations, plus adds creamy sweetness.
- Pink sanding sugar or pink food coloring: Adds a pop of color to the ears for that authentic bunny look.
- Large marshmallows: When halved, they make the cutest bunny cheeks you’ve ever seen.
- Mini chocolate chips or black decorating gel: Perfect for dotting on expressive eyes and a little nose.
- Jelly beans or pastel candies: For a festive border and extra bursts of color and flavor.
- Construction paper or cardstock (optional): Create fun, upright bunny ears to give your cake extra character.
How to Make Easter Bunny Cake
Step 1: Prepare and Bake the Cakes
Start by preheating your oven to 350°F. Mix the cake batter according to the instructions on your box, making sure everything is smooth and lump-free. Divide the batter evenly between two 9-inch round cake pans, smoothing the tops for even baking. Bake for 25 to 30 minutes, or until a toothpick inserted in the center comes out clean. Let the cakes cool completely—this step is crucial for easy decorating later!
Step 2: Shape the Bunny
Once your cakes are fully cooled, place one round cake on your serving platter; this will be the bunny’s face. Take the second round cake and slice it in half to create two equal semicircles. These will become the bunny’s ears. Arrange each half on either side of the “face” in a way that mimics floppy bunny ears. If you want to get creative, trim the ends into gentle points for a more realistic shape.
Step 3: Frost and Apply the Coconut “Fur”
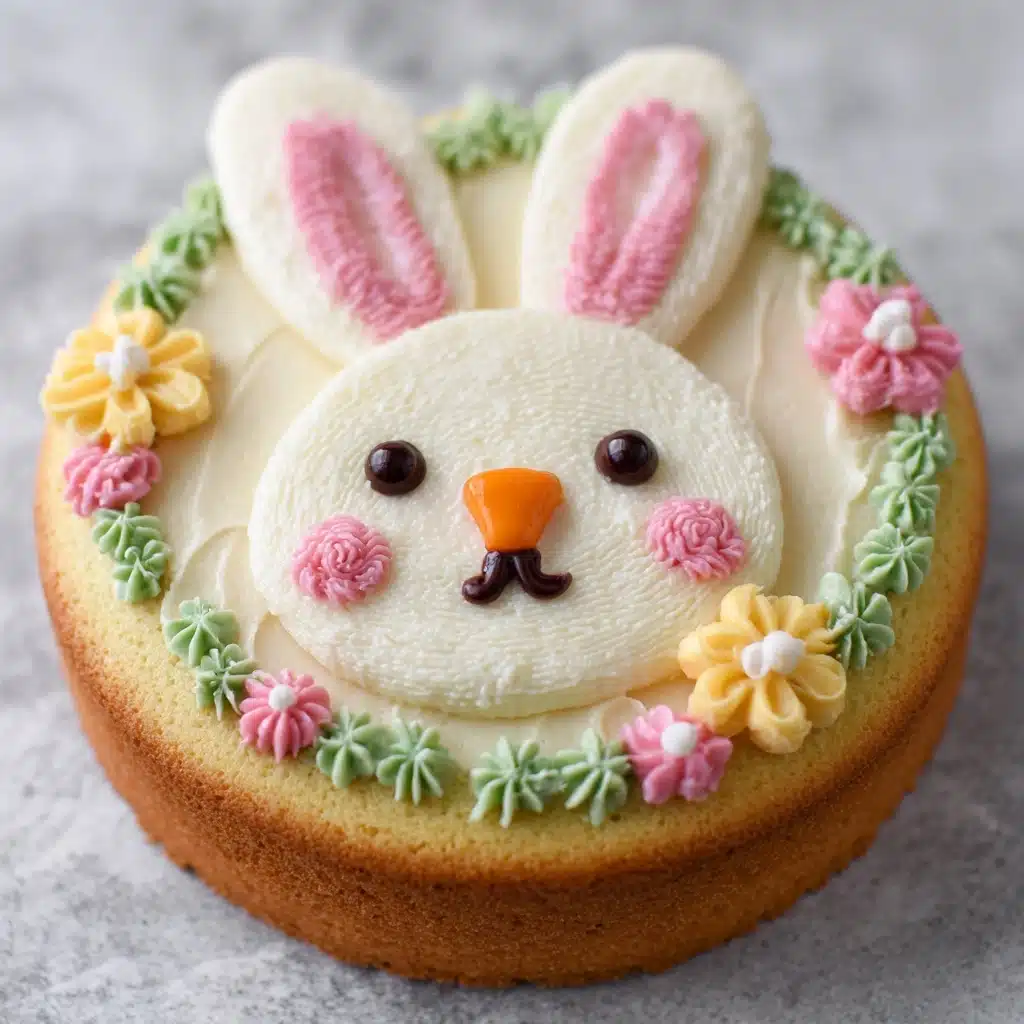
Spread a thin layer of vanilla frosting all over the bunny’s face and ears—this is your crumb coat, which helps keep stray crumbs locked in. Chill for about 15 minutes to set. Next, add a generous, even layer of frosting over the entire cake, making sure every nook and cranny is covered. Gently press shredded coconut onto the frosting, covering the whole cake in a fluffy, white “fur” coat.
Step 4: Decorate the Bunny’s Face and Ears
Sprinkle pink sanding sugar or use a bit of pink-tinted coconut in the centers of the bunny ears to create that classic look. Place mini chocolate chips or use black decorating gel to make the eyes and nose. For the cheeks, cut the marshmallows in half and press them just below the nose for an irresistibly cute touch. Finish by scattering jelly beans or pastel candies around the base—this adds color and a little extra sweetness.
Step 5: Add the Finishing Touches
If you want your Easter Bunny Cake to have real personality, cut bunny ear shapes out of construction paper or cardstock, then attach them to toothpicks or straws and stand them up behind the cake. This playful detail is a hit with kids and makes your bunny instantly Instagram-worthy!
How to Serve Easter Bunny Cake
Garnishes
A sprinkle of extra coconut or a dusting of powdered sugar can make your Easter Bunny Cake look even more magical. For extra flair, add edible flowers, pastel sprinkles, or a scattering of mini eggs around the platter. These simple touches elevate the cake from cute to absolutely unforgettable!
Side Dishes
Pair your Easter Bunny Cake with light, fresh sides like fruit salad or lemony tea for a balanced dessert table. Bright flavors like berries, citrus, or a simple fruit compote complement the cake’s sweetness and keep the whole spread feeling festive and spring-inspired.
Creative Ways to Present
Instead of a regular cake plate, serve your Easter Bunny Cake on a bed of Easter grass or pastel shredded paper for a true holiday vibe. You can also use a large wooden board and arrange colorful eggs and candies all around the bunny for a centerpiece that doubles as dessert and décor. Don’t be afraid to let the kids help with decorating—their wild ideas often make for the cutest cakes!
Make Ahead and Storage
Storing Leftovers
If you find yourself with leftover Easter Bunny Cake (a rare occurrence!), simply cover the cake with plastic wrap or store slices in an airtight container at room temperature for up to two days. The coconut helps keep the cake moist, so it tastes just as good the next day.
Freezing
To freeze, wrap individual slices tightly in plastic wrap and then place them in a freezer-safe bag or container. The cake will keep beautifully for up to two months. When you’re ready for a sweet treat, just thaw a slice at room temperature for about an hour.
Reheating
No need to reheat this cake, since it’s best enjoyed at room temperature! If you’ve frozen your Easter Bunny Cake, let it thaw completely before serving to keep the frosting and coconut at their fluffiest.
FAQs
Can I use a different flavor of cake mix for my Easter Bunny Cake?
Absolutely! While white cake is classic for that snowy bunny look, you can switch things up with carrot cake, lemon, or even a pastel-tinted funfetti base. Just make sure to keep the decorations light so the bunny details stand out.
How far in advance can I assemble the Easter Bunny Cake?
You can bake the cake rounds a day ahead and store them tightly wrapped. Assemble and decorate the cake the morning of your event for the freshest look. If you need to prepare it earlier, wait to add the decorations until just before serving.
Can I make a dairy-free or gluten-free version?
Yes! There are wonderful dairy-free and gluten-free cake mixes and frostings available. Just check your ingredient labels, and swap in plant-based or allergy-friendly alternatives for the cake and frosting components.
What’s the best way to color the coconut for the bunny ears?
Place a small amount of shredded coconut in a zip-top bag, add a drop or two of pink food coloring, seal, and shake until evenly tinted. Let it dry for a few minutes before using for the perfect pastel pink effect.
Can kids help decorate the Easter Bunny Cake?
Definitely! Kids love scattering coconut and arranging candies, and this cake is all about having fun together. Let little hands help with the “fur” and the face—no two bunnies ever look exactly alike, and that’s half the charm!
Final Thoughts
There’s something magical about gathering around a homemade Easter Bunny Cake—it’s a dessert that’s as joyful to make as it is to share. Whether you’re baking with kids or surprising your friends at brunch, this cake brings the spirit of spring right to your table. Give it a try this year, and let the bunny bring smiles and sweetness to your Easter celebration!
Print
Easter Bunny Cake Recipe
- Total Time: 55 minutes (plus cooling and decorating)
- Yield: 12 servings 1x
- Diet: Vegetarian
Description
This Easter Bunny Cake is a delightful and festive dessert perfect for celebrating the holiday. Featuring a tender white cake coated with creamy vanilla frosting and coconut ‘fur,’ this bunny-shaped cake is decorated with pink accents, marshmallow cheeks, and playful candy details. It’s not only visually charming but also delicious, making it a fun centerpiece for your Easter table.
Ingredients
Main Ingredients
- 1 box white cake mix (plus eggs, oil, and water as per box instructions)
- 1 1/2 cups sweetened shredded coconut
- 2 1/2 cups vanilla frosting (store-bought or homemade)
Decorations
- Pink sanding sugar or pink food coloring
- 2 large marshmallows
- 1/4 cup mini chocolate chips or black decorating gel (for eyes and nose)
- Jelly beans or pastel candies (for decoration)
- Construction paper or cardstock for bunny ears (optional)
Instructions
- Preheat and Prepare Cake Pans: Preheat your oven to 350°F. Prepare the cake mix as directed on the package, typically combining the mix with eggs, oil, and water. Stir until the batter is smooth and evenly mixed.
- Bake the Cakes: Divide the batter evenly between two 9-inch round cake pans. Place them in the oven and bake for 25-30 minutes or until a toothpick inserted in the center comes out clean. Remove from the oven and allow the cakes to cool completely in the pans, then transfer to wire racks.
- Shape the Bunny: Place one whole cake round on a large serving platter; this will form the bunny’s face. Cut the second cake round into two equal halves and arrange these halves on either side of the whole cake to resemble bunny ears. Optionally, trim the edges to create a more natural ear shape.
- Crumble Coat with Frosting: Apply a thin layer of vanilla frosting over the entire cake to seal in crumbs and create a smooth base for final frosting. This crumb coat ensures a neat, clean finish.
- Final Frosting Layer and Coconut Fur: Once the crumb coat is set, apply a thick, even layer of vanilla frosting all over the cake. Immediately press shredded coconut evenly over the frosting to mimic the fluffy texture of bunny fur.
- Decorate the Ears and Face: Use pink sanding sugar or lightly tinted coconut to fill in the centers of the ears for added color and dimension. For the bunny’s eyes and nose, place mini chocolate chips or use black decorating gel carefully on the frosting.
- Add Marshmallow Cheeks and Candy Accents: Cut marshmallows in half and attach them just below the nose area to create rosy cheeks. Decorate around the base of the cake with colorful jelly beans or pastel candies to add festive flair.
- Optional Bunny Ears Accessory: If desired, cut bunny ears from construction paper or cardstock and attach them behind the cake with toothpicks or straws to stand upright for a three-dimensional effect.
Notes
- Customize the flavor by adding almond or lemon extract to the cake batter for a unique twist.
- Substitute white cake with carrot cake for a seasonal variation.
- For a colorful surprise, tint the cake batter with pastel food coloring before baking.
- Ensure cakes are completely cooled before frosting to prevent melting or sliding.
- Use a serrated knife for clean, smooth cuts when shaping the ears.
- Prep Time: 25 minutes
- Cook Time: 30 minutes
- Category: Dessert
- Method: Baking
- Cuisine: American
Nutrition
- Serving Size: 1 slice
- Calories: 410
- Sugar: 38 g
- Sodium: 320 mg
- Fat: 18 g
- Saturated Fat: 10 g
- Unsaturated Fat: 6 g
- Trans Fat: 0 g
- Carbohydrates: 58 g
- Fiber: 1 g
- Protein: 3 g
- Cholesterol: 40 mg


