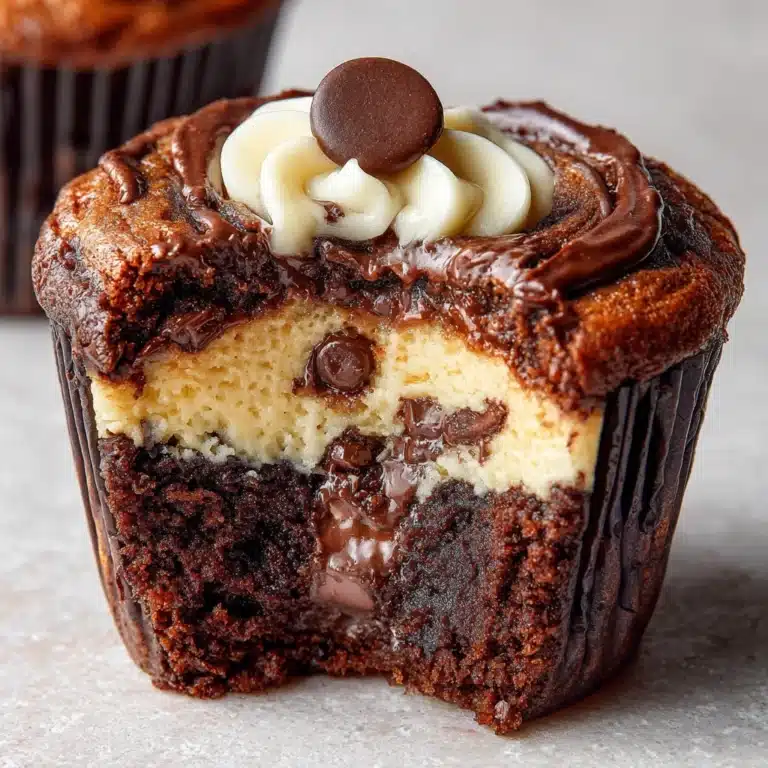
If you’re craving a dessert that masterfully combines the creamy richness of classic cheesecake with the decadent allure of chocolate swirls, this Chocolate Marble Cheesecake Recipe is exactly what you need. Every bite reveals a stunning marbled pattern that tastes just as gorgeous as it looks, marrying smooth cream cheese with luscious semi-sweet chocolate for a heavenly balance of flavors and textures. Whether it’s for a special occasion or a cozy night in, this cheesecake promises to impress and delight both your eyes and your taste buds.

Ingredients You’ll Need
Creating this Chocolate Marble Cheesecake Recipe requires simple, pantry-friendly ingredients that each serve a key role in ensuring perfect texture, flavor, and appearance. From the buttery, crunchy crust to the silky, chocolatey filling, every element works harmoniously.
- Graham cracker crumbs: These form the classic, crunchy base that contrasts beautifully with the creamy filling.
- Granulated sugar: Sweetens both the crust and the filling, balancing the richness of the cream cheese and chocolate.
- Unsalted butter: Melted and mixed into the crust for a golden, firm foundation.
- Cream cheese: The heart of the cheesecake, soft and smooth, delivering that signature velvety texture.
- Vanilla extract: Enhances and deepens the overall flavor with warm, fragrant notes.
- Eggs: Essential for structure and creaminess, binding the filling perfectly as it bakes.
- Sour cream: Adds moisture and a slight tang, keeping the cheesecake tender and balanced.
- Semi-sweet chocolate: Melted to swirl into the batter, creating those irresistible chocolate marble patterns and rich taste.
How to Make Chocolate Marble Cheesecake Recipe
Step 1: Prepare the Crust
Start by preheating your oven to 325°F (163°C) and preparing a 9-inch springform pan. Lightly grease it and wrap the bottom with foil if you plan to use a water bath, which helps prevent cracks. Mix graham cracker crumbs with sugar and melted butter until fully combined. Press this mixture evenly into the bottom of the pan to form your crust, then bake it for 8 to 10 minutes. This pre-baking step ensures the crust stays crisp and flavorful under the creamy filling.
Step 2: Make the Cream Cheese Filling
Beat softened cream cheese and sugar in a large bowl until you get a smooth, creamy texture with no lumps. Adding the eggs one at a time ensures a homogeneous mix, preventing cracks and helping the cheesecake rise evenly. Stir in the vanilla extract and sour cream, which offer subtle depth and moistness, rounding out the rich flavor profile.
Step 3: Create the Marble Effect
Pour about two-thirds of this plain cream cheese batter over your cooled crust, spreading it gently and evenly. Into the remaining batter, fold in your melted, slightly cooled semi-sweet chocolate to avoid cooking the eggs. Dollop spoonfuls of the chocolate batter atop the plain layer, then use a knife or skewer to swirl the two batters together delicately. This swirling action forms those elegant, chocolatey marbled patterns that make this cheesecake visually stunning and uniquely delicious.
Step 4: Bake to Perfection
Bake for 50 to 60 minutes, watching for the center to become just set while the edges turn slightly puffed – that’s when you know it is perfectly baked. Then turn off the oven, crack the door open, and let the cheesecake cool inside for one hour. This gradual cooling helps prevent cracks and sets the texture for a silky finish.
Step 5: Chill and Serve
Once cooled, refrigerate the cheesecake for at least 4 hours or preferably overnight. This chilling period allows the flavors to meld and the cheesecake to firm up to the right sliceable consistency, making your Chocolate Marble Cheesecake Recipe shine in every serving.
How to Serve Chocolate Marble Cheesecake Recipe

Garnishes
Fresh berries like raspberries or strawberries add a bright, tart contrast to the richness. A light dusting of cocoa powder or powdered sugar can elevate the chocolatey notes. For extra indulgence, drizzle with chocolate ganache or sprinkle with shaved chocolate curls to mimic those lovely swirls you see inside.
Side Dishes
Pairing your cheesecake with a dollop of lightly sweetened whipped cream enhances the creaminess without overpowering the dessert. A cup of freshly brewed coffee or an espresso shot complements the chocolate marbling perfectly, cutting through the richness and refreshing your palate.
Creative Ways to Present
Serve slices on elegant dessert plates with a few edible flowers for a touch of sophistication. You can also offer mini versions in small jars for individual servings at parties, allowing everyone to appreciate the beautiful marble pattern up close. Another fun idea is to layer chunks of this cheesecake with fruit compote in parfait glasses to create a visually stunning dessert cocktail.
Make Ahead and Storage
Storing Leftovers
Keep any leftover cheesecake tightly wrapped in plastic wrap or stored in an airtight container in the refrigerator. Proper storage ensures moisture retention and keeps flavors fresh, letting you enjoy the Chocolate Marble Cheesecake Recipe for several days without losing its wonderful texture or taste.
Freezing
This cheesecake freezes wonderfully. Simply wrap it well in plastic wrap and then aluminum foil to prevent freezer burn. It can be frozen for up to one month, perfect for making ahead for celebrations or unexpected guests. Thaw overnight in the refrigerator for best results before serving.
Reheating
Since cheesecake is best served cold, reheating is generally not recommended. If you prefer a softer texture, allow slices to sit out at room temperature for about 20 minutes before eating. This gentle warming enhances the creamy mouthfeel while preserving the integrity of the marbled design.
FAQs
Can I use a different type of chocolate for the marbling?
Absolutely! While semi-sweet chocolate offers a nice balance of sweetness and depth, you can experiment with dark chocolate for a richer flavor or milk chocolate for a sweeter twist. Just be sure to melt and cool it properly to incorporate smoothly into the batter.
Why should I chill the cheesecake overnight?
Chilling allows the cheesecake to fully set and the flavors to meld. This step is crucial for achieving that dense, creamy texture and making slicing clean and easy, which transforms this dessert into a show-stopping treat you’ll want to share.
Is it possible to make this recipe gluten-free?
Yes! Swap out the graham cracker crumbs for a gluten-free alternative or crushed gluten-free cookies. Just make sure your other ingredients like chocolate and sour cream do not contain gluten to keep the recipe safe for gluten-sensitive eaters.
How can I prevent cracks on top of the cheesecake?
Swirling the batter gently and avoiding overmixing helps maintain a smooth surface. Baking at a moderate temperature and cooling gradually in the oven with the door cracked prevents sudden temperature changes that cause cracking.
Can I make mini versions of this Chocolate Marble Cheesecake Recipe?
Yes, using mini springform pans or muffin tins lined with cupcake liners works great for bite-sized cheesecakes. Adjust the baking time to about 25–30 minutes and keep an eye on them to avoid overbaking.
Final Thoughts
This Chocolate Marble Cheesecake Recipe is one of those desserts that feels like a warm hug after a long day. Its gorgeous swirls and luscious texture invite you to savor every bite, and the simple yet thoughtful ingredients come together to create something truly special. I promise that once you try it, this will quickly become a beloved addition to your dessert repertoire—and a guaranteed hit whenever you bring it out to share.
Print
Chocolate Marble Cheesecake Recipe
- Total Time: 6 hours (including cooling and chilling)
- Yield: 12 servings 1x
- Diet: Vegetarian
Description
Enjoy a rich and creamy Chocolate Marble Cheesecake featuring a buttery graham cracker crust and a luscious blend of classic cheesecake batter swirled with melted semi-sweet chocolate. This elegant dessert is perfect for special occasions or anytime you crave a decadent treat.
Ingredients
For the crust:
- 1 1/2 cups graham cracker crumbs
- 1/4 cup granulated sugar
- 6 tablespoons unsalted butter, melted
For the filling:
- 24 oz cream cheese, softened
- 1 cup granulated sugar
- 1 teaspoon vanilla extract
- 3 large eggs
- 1/2 cup sour cream
- 4 oz semi-sweet chocolate, melted and slightly cooled
Instructions
- Prepare the oven and pan: Preheat your oven to 325°F (163°C). Lightly grease a 9-inch springform pan and wrap the bottom with foil if using a water bath to prevent leaks.
- Make the crust: In a medium bowl, combine the graham cracker crumbs, sugar, and melted butter. Press this mixture firmly and evenly into the bottom of the prepared pan. Bake for 8–10 minutes until set, then remove from oven and let it cool.
- Prepare the filling base: In a large mixing bowl, beat the softened cream cheese together with sugar until the mixture is smooth and creamy. Add the eggs one at a time, mixing well after each addition to ensure a smooth batter. Stir in the vanilla extract and sour cream until fully incorporated.
- Divide and flavor the batter: Pour about two-thirds of the cream cheese batter over the cooled crust. Stir the melted chocolate into the remaining batter until smooth and evenly combined.
- Create the marble effect: Spoon dollops of the chocolate batter over the plain batter in the pan. Using a knife or skewer, gently swirl the chocolate into the plain batter to create a beautiful marbled pattern.
- Bake the cheesecake: Place the pan in the oven and bake for 50–60 minutes, or until the center is just set but still slightly jiggly, and the edges are lightly puffed. Turn off the oven, crack the door open, and allow the cheesecake to cool inside for 1 hour to prevent cracks.
- Chill: Remove the cheesecake from the oven and chill in the refrigerator for at least 4 hours or preferably overnight to fully set and develop flavor before serving.
Notes
- For clean slices, wipe your knife with a warm damp cloth between each cut.
- Add a ganache topping or dust with cocoa powder for extra chocolate flavor and presentation.
- This cheesecake freezes well—wrap tightly in plastic wrap and aluminum foil, then freeze for up to 1 month.
- Prep Time: 25 minutes
- Cook Time: 1 hour
- Category: Dessert
- Method: Baking
- Cuisine: American


