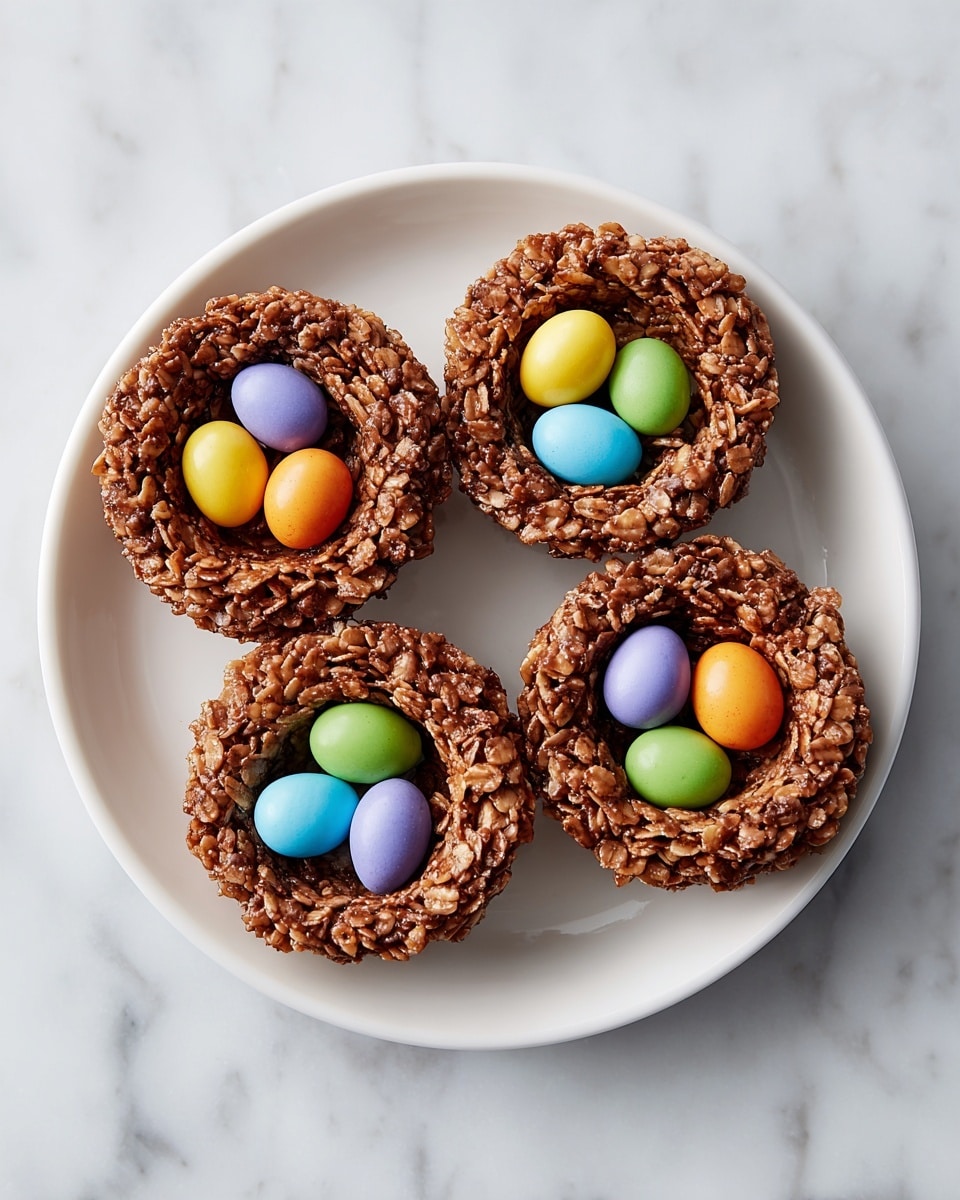
Nothing captures the spirit of spring and celebration quite like a batch of these delightful, crunchy, and chocolaty nests. This Easy Easter Nest Cookies Recipe is a total crowd-pleaser—combining the rich flavors of cocoa, buttery oats, and a hint of coconut, all topped off with colorful chocolate eggs nestled right on top. They’re as fun to make as they are to eat, bringing a playful and festive touch to your holiday table or any spring gathering. If you’re looking for a simple but impressive treat that everyone will adore, these cookies will become your new go-to!

Ingredients You’ll Need
Gathering these simple ingredients is a breeze, and each plays an important role in delivering the perfect balance of flavor, texture, and appearance. From the creamy butter that ties everything together, to the crunchy oats and chewy coconut that add dimension, you’ll find everything works harmoniously to create these charming nests.
- Unsalted butter (½ cup): Provides a rich, creamy base and helps bind the cookie mixture together.
- Milk (½ cup): Adds moisture and helps dissolve the cocoa and sugar for a smooth texture.
- Granulated sugar (2 cups): Sweetens the cookies and creates a glossy, slightly crisp finish.
- Cocoa powder (½ cup): Gives the nests their unmistakable chocolatey depth and color.
- Rolled oats (3 cups): Offers a chewy, hearty texture and structure to hold the nests’ shape perfectly.
- Shredded coconut (1 cup): Brings a tropical, chewy twist and complements the chocolate wonderfully.
- Chocolate eggs (as needed): The star topping that makes these cookies festive and irresistible, perfect for Easter celebrations.
How to Make Easy Easter Nest Cookies Recipe
Step 1: Prep and Cook the Chocolate Mixture
Start by lining your baking sheets with wax paper—this makes cleanup a breeze and prevents sticking. In a medium saucepan, combine the butter, milk, sugar, and cocoa powder. Gently heat the mixture while whisking constantly to ensure everything melts together smoothly. Once combined, bring it to a gentle boil and let it cook for 5 minutes, continuing to whisk. This step is crucial as it thickens the mixture and develops the rich chocolate flavor that makes these cookies so irresistible.
Step 2: Combine with Oats and Coconut
Remove the pan from the heat and immediately stir in the rolled oats and shredded coconut until everything is evenly coated. The oats provide chewy heartiness, while the coconut adds a wonderful texture contrast and a subtle tropical flair. Mixing this while it’s still warm helps the oats absorb a little moisture, so your nests will hold together beautifully without being soggy.
Step 3: Shape and Decorate the Nests
Using a tablespoon, drop portions of the mixture onto the prepared sheets. Now comes the fun part—gently press a small well into the center of each cookie to create the nest shape. Place 2 to 3 chocolate eggs into each indentation, nestling them snugly inside. You can shape the nests further with your fingers to make them look extra charming and authentic. This tactile step is where your creativity shines!
Step 4: Chill and Set
Pop the trays into the refrigerator and allow the cookies to chill for 45 minutes. This cooling time lets the nests firm up and prevents the chocolate eggs from sliding off when you pick them up. Once set, your Easy Easter Nest Cookies are ready to wow your guests and add a festive touch to any celebration.
How to Serve Easy Easter Nest Cookies Recipe
Garnishes
While the classic chocolate eggs are perfect as is, consider dusting your nests lightly with powdered sugar or edible glitter for a whimsical touch. Adding a sprinkle of toasted shredded coconut on top can amp up the texture and appearance beautifully. Each garnish enhances the presentation and makes these cookies even more enticing.
Side Dishes
These nests are fantastic on their own but pairing them with a scoop of vanilla or coconut ice cream really elevates the experience. Fresh spring berries like strawberries or raspberries also complement the chocolate and add a burst of freshness. If you’re serving these as part of an Easter spread, cottage cheese or creamy yogurt with honey is a great neutral side that balances all the sweetness.
Creative Ways to Present
Consider arranging the nests on a platter lined with pastel-colored parchment paper to amp up the seasonal feel. Individually wrap each cookie in cellophane tied with a colorful ribbon for adorable party favors or gifts. You can even serve them in small paper muffin cups for a tidy, festive presentation perfect for kids’ parties or buffets.
Make Ahead and Storage
Storing Leftovers
These Easy Easter Nest Cookies Recipe treats store wonderfully in an airtight container at room temperature for up to 5 days. Keeping them covered ensures they stay crisp and fresh without absorbing moisture from the air. This makes them an excellent make-ahead snack for busy holiday weekends.
Freezing
If you want to prepare the nests well in advance, you can freeze them. Arrange the cookies in a single layer on a baking sheet and freeze until firm, then transfer to a freezer-safe container or bag. They’ll keep their flavor and texture for up to 2 months. When you’re ready to enjoy, simply thaw at room temperature—no reheating necessary!
Reheating
These cookies are best enjoyed as-is after setting, so reheating is generally unnecessary and may cause the chocolate eggs to melt or the nests to lose their shape. If you prefer them slightly warm, you can gently warm a small batch in the microwave for 10-15 seconds, but be cautious to avoid melting the decorative eggs.
FAQs
Can I substitute quick oats for rolled oats in this recipe?
Yes, quick-cooking oats can be used if that’s what you have on hand. The texture will be slightly different—quicker oats tend to be softer and less chewy—but the cookies will still turn out delicious and hold their shape well.
What kind of chocolate eggs work best for these nests?
Classic Cadbury Mini Eggs or Whoppers Robin Eggs are fantastic because of their colorful candy coating and small size. However, you can use any small chocolate eggs you prefer. Just make sure they’re bite-sized and won’t melt too easily.
Can I make these nests gluten-free?
Absolutely! Just be sure to use certified gluten-free rolled oats to keep the recipe safe for those with gluten sensitivities. The rest of the ingredients are naturally gluten-free.
How long do these cookies take to set?
About 45 minutes in the fridge is usually perfect for the nests to firm up. If you want to speed things up, you can freeze them for about 20 minutes instead, but chilling is recommended for the best texture.
Can I add nuts or dried fruit to this recipe?
Definitely! Chopped nuts such as almonds or pecans add a nice crunch, and dried fruit like raisins or chopped apricots brings a sweet chewiness. Just mix them in with the oats and coconut before shaping the nests.
Final Thoughts
There’s something truly joyful about making and sharing these Easy Easter Nest Cookies Recipe. They’re simple, fun, and packed with flavors and textures that everyone loves. Whether you’re baking for a festive gathering, a classroom party, or just because you want a delicious chocolate treat with a spring twist, these nests will deliver smiles all around. So grab your ingredients, get a little messy with those nests, and enjoy a sweet, chewy taste of Easter magic!
Print
Easy Easter Nest Cookies Recipe
- Total Time: 1 hour (including chilling time)
- Yield: 32 cookies 1x
- Diet: Vegetarian
Description
These Easy Easter Nest Cookies are a delightful no-bake treat perfect for spring celebrations. Made with a rich chocolate mixture combined with oats and coconut, then shaped into charming nests filled with colorful chocolate eggs, they are simple to prepare and loved by kids and adults alike.
Ingredients
Main Ingredients
- ½ cup unsalted butter
- ½ cup milk
- 2 cups granulated sugar
- ½ cup cocoa powder
- 3 cups rolled oats (old-fashioned or quick-cooking)
- 1 cup shredded coconut
- Chocolate eggs (such as Cadbury Mini Eggs or Whoppers Robin Eggs), 2-3 per cookie
Instructions
- Prep and Cook: Line baking sheets with wax paper. In a saucepan, melt the butter, milk, sugar, and cocoa powder together over medium heat, whisking continuously until smooth. Bring the mixture to a gentle boil and cook for 5 minutes, whisking constantly to prevent burning and ensure even cooking.
- Combine with Oats and Coconut: Remove the saucepan from heat and immediately stir in the rolled oats and shredded coconut until all the dry ingredients are fully coated and combined with the chocolate mixture.
- Shape Nests: Drop tablespoon-sized portions of the mixture onto the prepared wax paper-lined baking sheets. Using the back of the tablespoon or your fingers, create a small indentation in the center of each cookie to form the nest shape. Place 2-3 chocolate eggs in the center of each indentation. Gently shape the mixture with your fingers to resemble bird’s nests if desired.
- Chill and Serve: Refrigerate the shaped cookies for at least 45 minutes to allow them to set firmly. Once chilled, they are ready to serve and enjoy.
Notes
- Use rolled oats rather than instant oats for better texture.
- Ensure constant whisking during boiling to avoid burning the chocolate mixture.
- These cookies do not require baking.
- Store leftovers in an airtight container in the refrigerator for up to one week.
- For a nutty twist, add chopped nuts like walnuts or almonds into the oat mixture before shaping.
- Prep Time: 10 minutes
- Cook Time: 5 minutes
- Category: Dessert
- Method: No-Cook
- Cuisine: American
